Online Archive
Note: Online Archives may be enabled for current University employees by departmental request in cases where that mailbox is already at the maximum 5 GB quota and still needs additional storage to meet their department's business needs. If you would like to enable Online Archive for your account, please contact the help desk for assistance verifying that you are already at the maximum quota and still need additional space. You can check this yourself with WebTools.
To get online archiving enabled for your umail account, please submit a request to the help desk.
Using Online Archiving with Outlook
Once the online archive feature has been enabled, you will see an additional mailbox listed in the Folder Pane. It will be titled "Online Archive". Outlook items can be dragged manually to this location, or you can set up rules to move items automatically. Follow these steps to set up rules on folders.
- Right click on the folder you would like to archive and select Properties.
- Select the Policy tab. Use the dropdown menu under the Online Archive section to select the age of items to move into the archive. For example, if you select 1 year, any items in the folder that are over a year old will be archived.
- NOTE: Do not use the Folder Policy options, these policies will completely delete mail items instead of archiving.
- To enable more choices (30 days, 60 days, 90 days, etc) follow step 4 in the following section.
- Once the rule has been put in place, it will take about 12-24 hours to go into effect. You will not see items move over immediately.
Using Online Archine with OWA (Outlook Web Access)
You can also access your online archive via Outlook Web Access. It will appear as "Personal Archive" on the left hand side of the page. Outlook items can be dragged manually to this location, or you can set up rules to move items automatically. Follow these steps to set up rules on folders.
- Right click on the folder you would like to archive.
- Mouse over the Archive Policy, then select the time period you would like to archive. For example, if you select 1 year, any items in the folder that are over a year old will be archived.
- NOTE: Do not use the Retention Policy options, these policies will completely delete mail items instead of archiving.
- To enable more options for archiving, click on Options, then select See All Options.
- Select Organize Email on the left, then Retention Policies, then click Add. Select any additional policy and click Add, then Save. Additional archive date options will be available in OWA and via Outlook.
- Once the rule has been put in place, it will take about 12-24 hours to go into effect. You will not see items move over immediately.
How to transfer existing local archive files
CSBS Computing highly recommends transferring your existing local archive (.pst) files over to the online archive. The instructions below are for Outlook for windows. To import your existing local archive (.pst) file, follow the steps below.
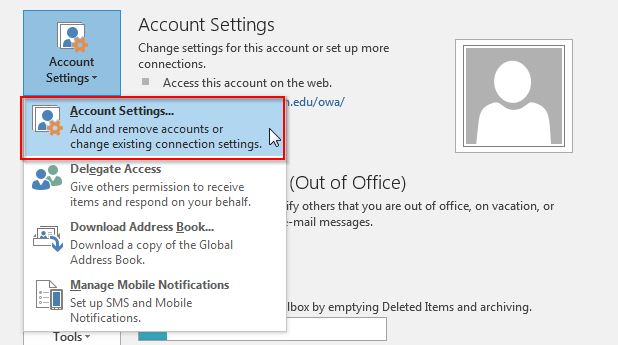
- To remove the local archive from Outlook, select File -> Account Settings dropdown -> Account Settings.
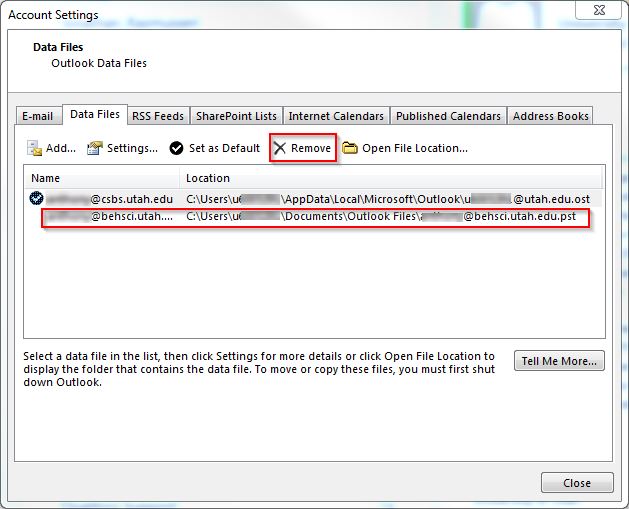
- Click on the Data Files tab. Here you will see your current ost file, as well as any .pst files that are
currently added to Outlook. Take note of the Location listed for each pst file. Select the pst file and click Remove. This will only remove it from Outlook, not delete it entirely.
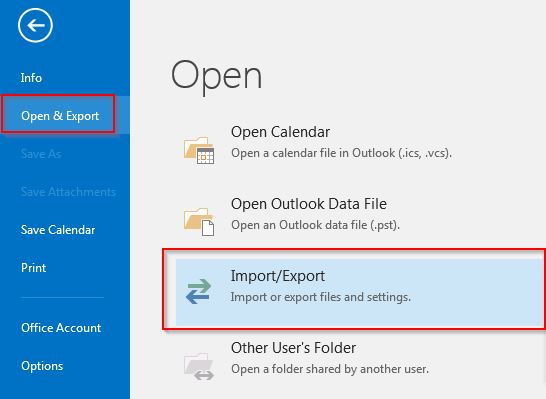
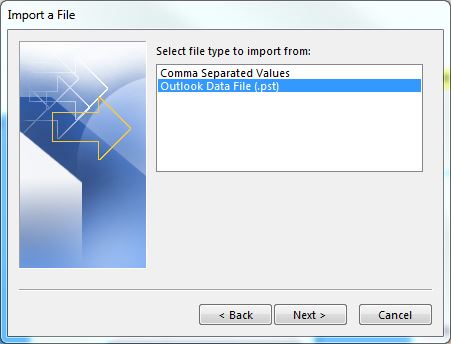
- To move the local pst archives to your online archive, start by going to File -> Open and Export -> Import/Export
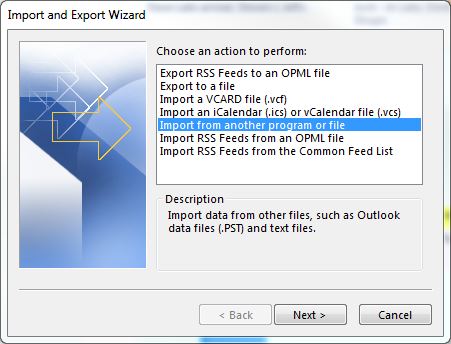
- Select Import from another program or file
- Select Outlook Data File (.pst)
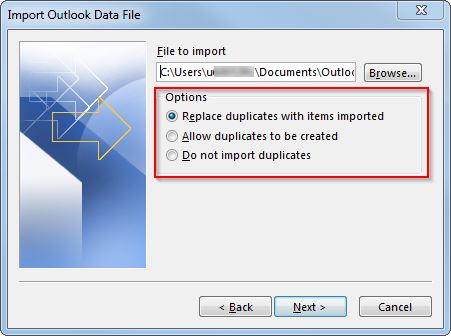
- Click on Browse and then navigate to the location you noted down during step 1b. Select the radio
button which best describes how you would like to handle duplicates. CSBS recommends
the pictured option below.
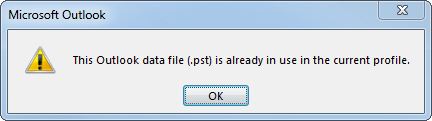
- NOTE: If you did not remove the pst file from Outlook previously, you will run into the
below error. Follow step 1b before attempting.
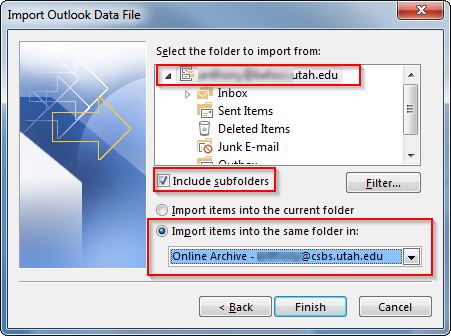
- This last screen will allow you to import part or all of the content from that pst
file, to migrate all of the content, make sure the top level is highlighted as shown
below, along with the Include Subfolders option. Then, use the drop down menu to select your online archive. It should be
shown as Online Archive - yourname@utah.edu. Click Finish to start the import process. During this time, Outlook will not be usable until the
import process is complete.
- Once all the desired content has been copied into your Online Archive, and you have
checked it to
ensure you are happy with it, you should delete the original PST file.